Direct Positive Paper with an 8x10.
AUGUST 2024
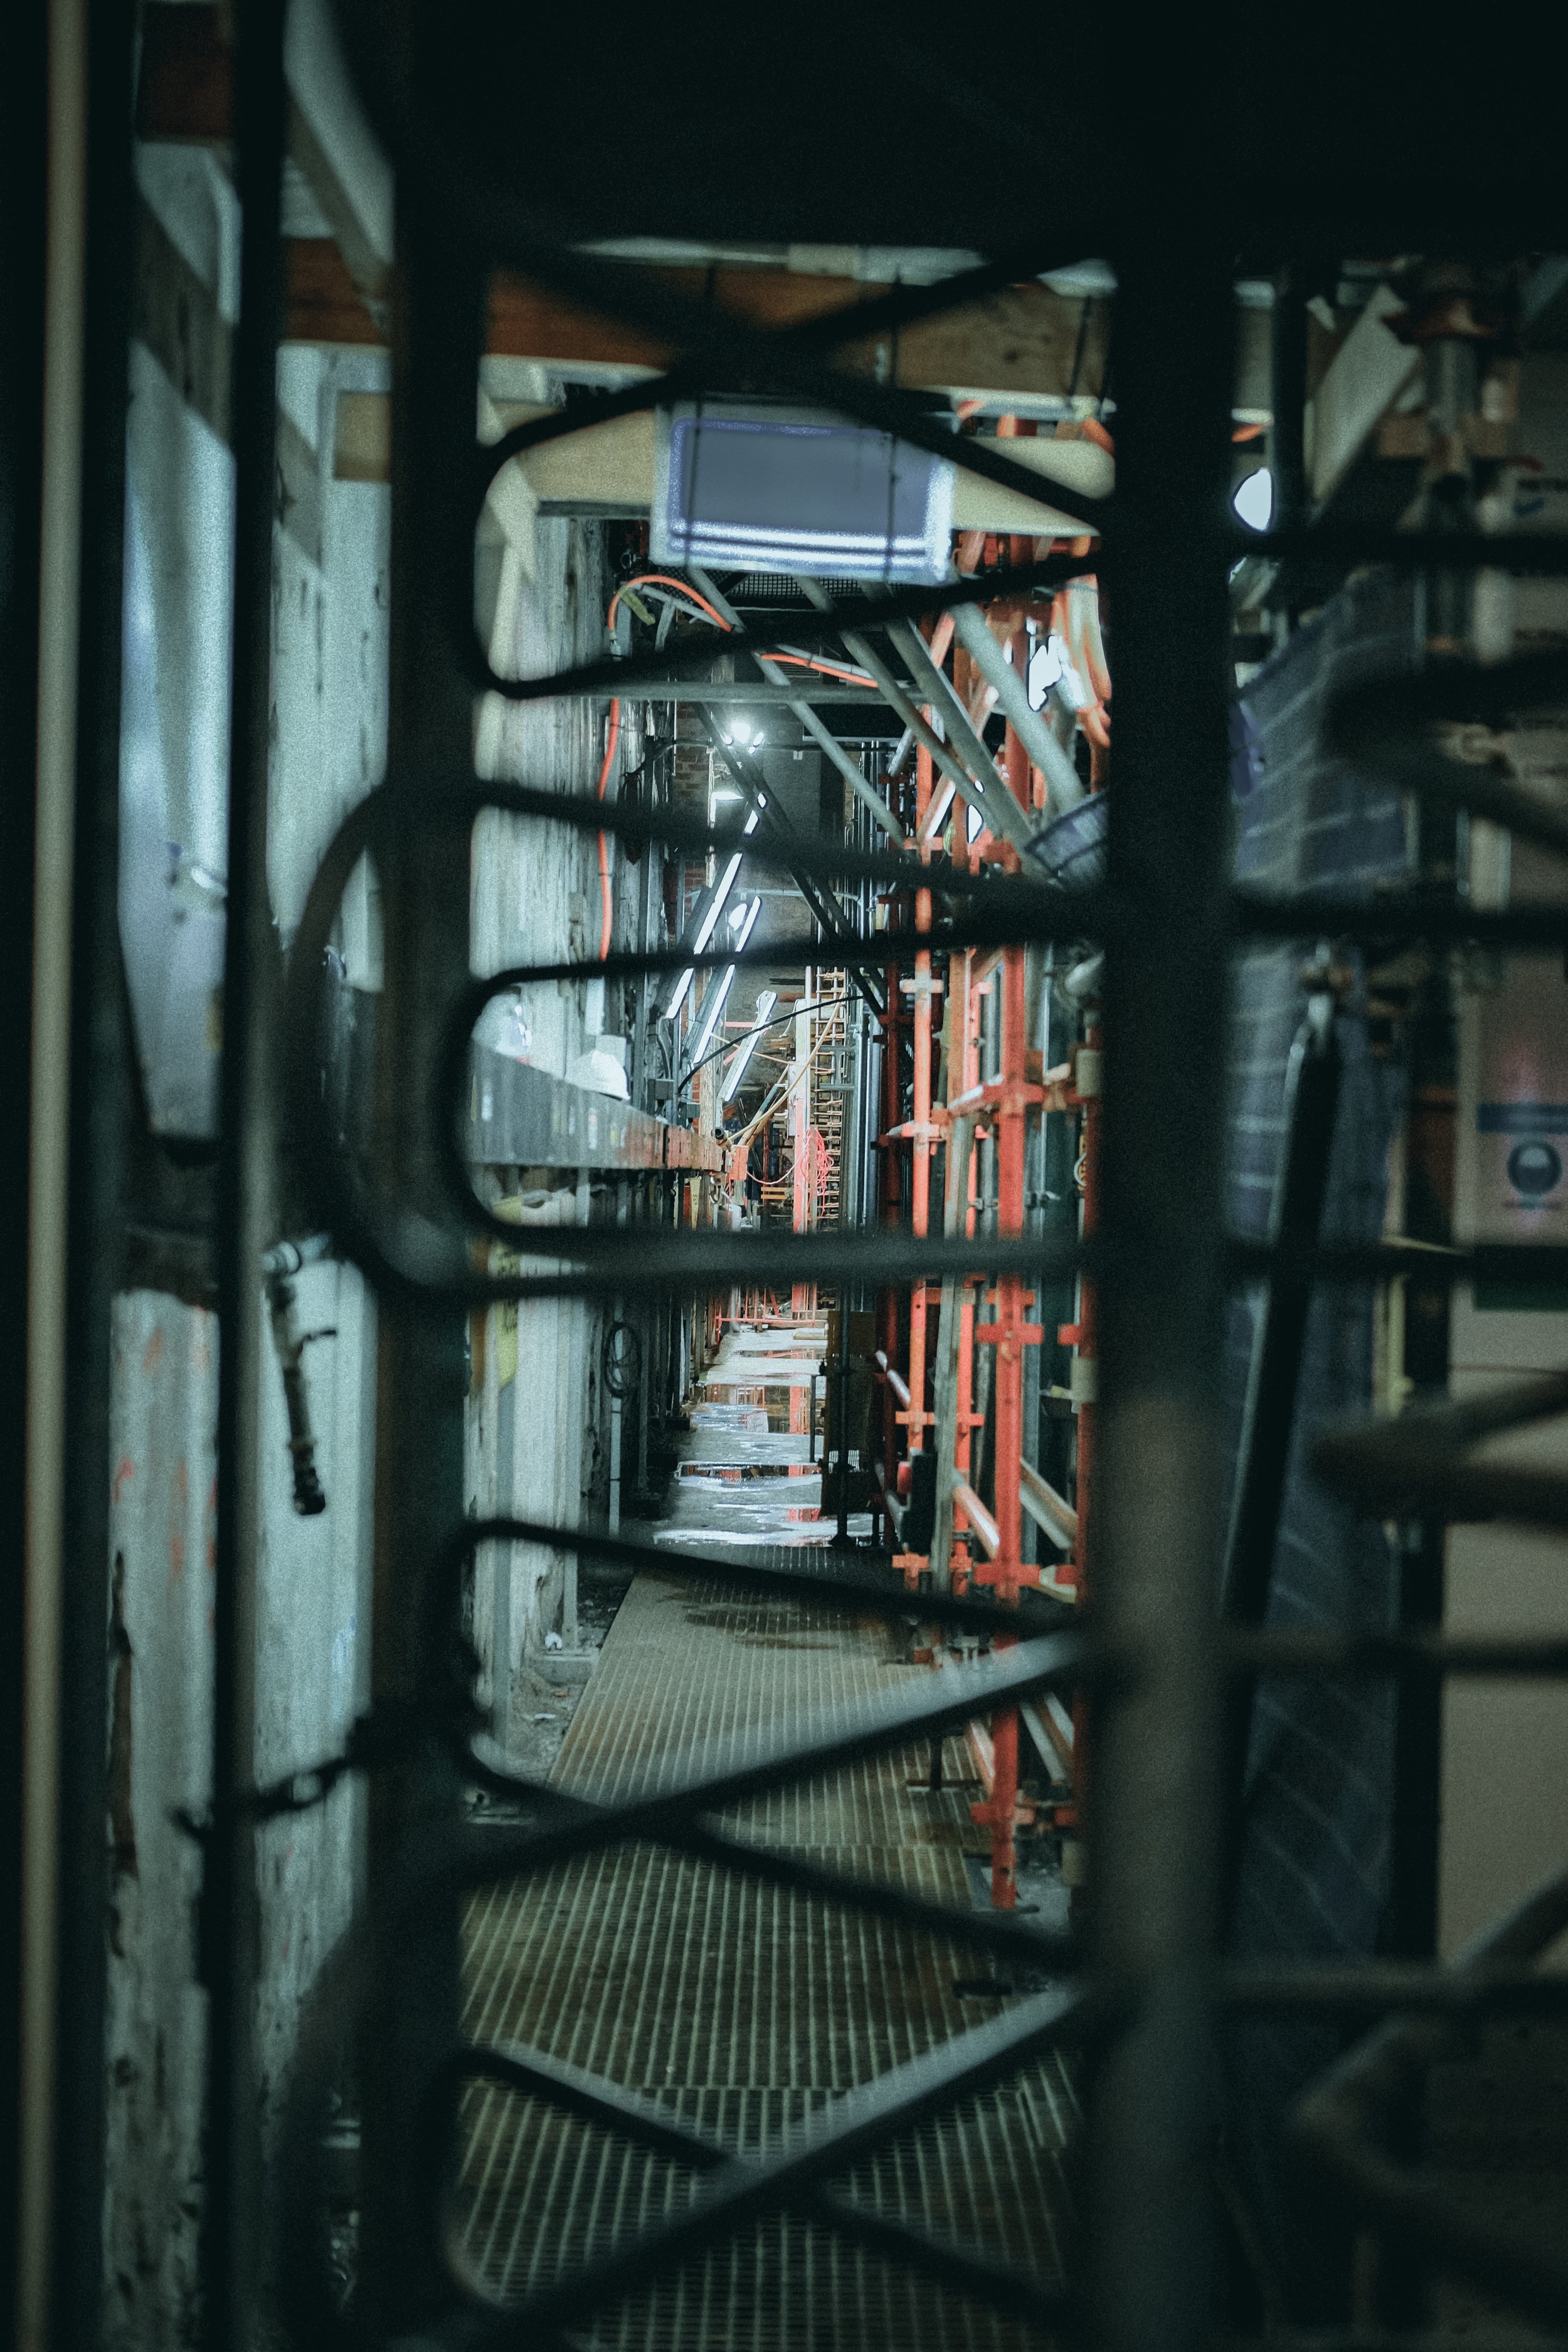
Soooo. I think this is going to be a project that’s ongoing for some time. It took some time to get the equipment I needed but, even now, I think it might be changing as time goes on. I had already purchased the Intrepid 8x10 and some other bits to start doing Tin Types. I actually made some good progress and started to get some good results but quickly realised, it was just too much for me to do at that time. With the chemicals and space needed, I decided to put it on the back burner.
When I was browsing the internet I came across Harmen Direct Positive Paper and became interested in what kind of results people were getting, the set up was similar to what I already had, I just didn’t need so many harmful chemicals sitting around. I already had a lot of the equipment, except a large format lens, to which I acquired by trading in some medium format gear. The lens I had for Tin Types didn’t have a shutter, which I would definitely need for some consistency.


Direct positive paper is what I consider, a print straight out of camera. Once it’s exposed, a quick develop, stop and fix and there it is, a positive black and white image on a nice fibre based glossy piece of paper. The only problem is… it’s very slow with an ISO of like… 2, maybe even 1 and it’s very contrasty, the blacks are black and whites are white. I had seen a lot of varying results online, some were honestly quite terrible and others were seriously impressive. I’m hoping to go down the more impressive route, my first 3 exposures are telling me otherwise though, there under exposed and a smidge out of focus. The one below is just a photo taken on my phone, it’s the best out of the 3 and does look much better in person!

I wanted this to be a project on people who have and interesting story, or in there environment, be that at work, at home or somewhere they just love, kind of environmental portraits but with some context, if that makes sense. Maybe a close up more intimate portrait if it’s the telling of a story and something more wide and open if it’s more of an environmental portrait.
After my first 3 exposures I quickly realised I’m going to have a problem with the wider environmental portraits. Even on a bright sunny day here down under, the light was only just enough to achieve F5.6 at 1/20th. This is most definitely not fast enough for any portraits I was hoping to take inside and, honestly, there is no amount of flash or continuous lighting that will make it doable for some of the larger/wider scenes I had in mind.
I’m thinking I might have to move to Black and White film for this endeavour. I’ll only need a film holder to replace my plate holder and a scanner to do so. My only problem then, is that once it’s digitised, eventually, it has to be printed adding another cost.
The box of 25 sheets that I have purchased will very much be used to hone in my skill and practice/experiment. The next few I do ill be rating at ISO1 rather that ISO3 and see how they turn out. I’ll keep this blog updated with my progress.
MAY 2025
Time moves fast and I just couldn’t find the time to get the 8x10 out during the summer season, very annoying! However, I had 4 hours free one morning this past week so set up in the driveway to use the last 4 sheets of Direct Positive Paper I had remaining. Previous to this, I had set up in the living room one evening to attempt a few portraits under some consistent lighting so that I could dial in the flash settings, I was happy with the exposure’s I got (I cant share the photo’s I’m afraid), but… I had some developing problems with he fixer and it was turning the paper completely black, turns out it wasn’t the fixer, it was just me being stupid, I was turning off the safe light to early in the process.
Fast forward to the 4 free hours on my driveway, I had everything set up, I used two 750w lights just off to each side front facing, one 500w just behind the subject pointing at the back drop and one 500w light behind, above and off to the side as a bit of rim light.


I put the lights on full power based on what I had previously experienced inside the house, it was hugely over exposed, my guess was the UV light being outside in direct sun had a lot to do this, at 1/60th at f8, I didn’t think it would make so much of a difference at a speed of ISO1, but I was wrong. That’s me now down to 3 sheets remaining. I dropped the flash power on the two 750w by 25% and took another, this time of myself so, the focus is out a bit but I didn’t want to waste anyone else’s time until I had some decent exposures.
I was getting close but, still over exposed. I had 2 sheets left and was now worried that if I dropped the flash power again, I wouldn’t have much light at all anywhere else in the frame. I decided to pull the lights back a little and drop the power by another 25% ish and just see what happens.
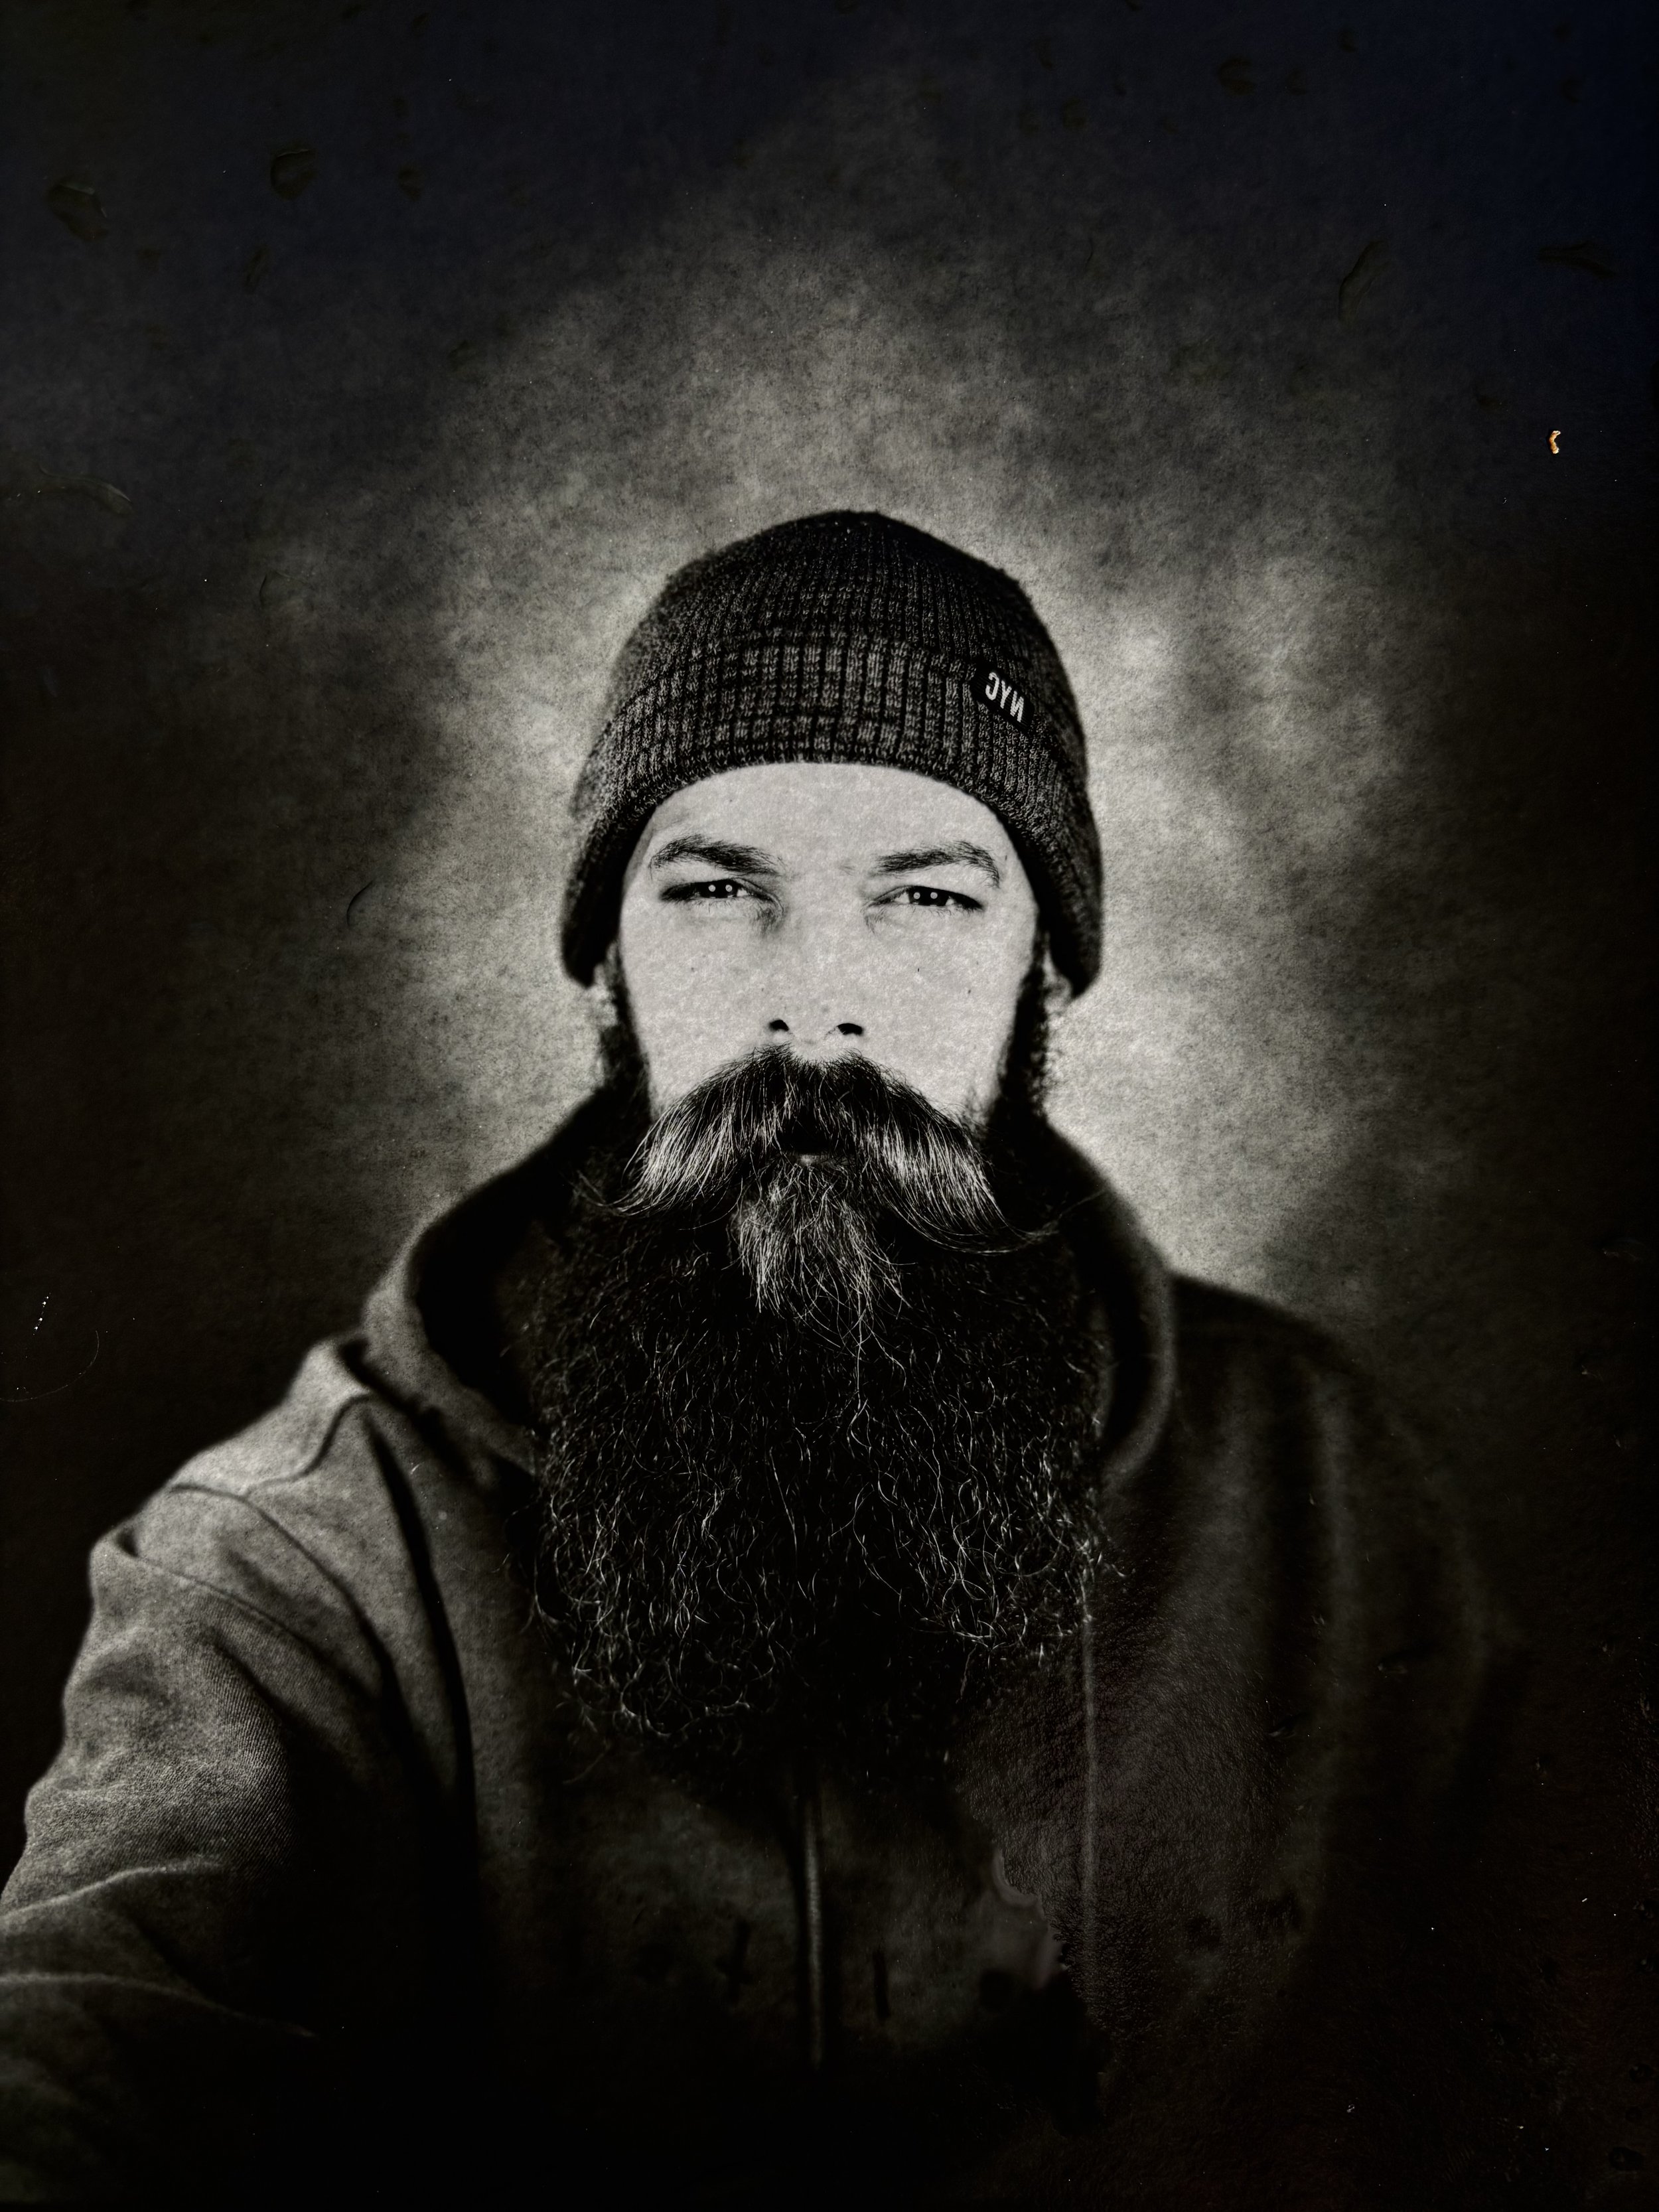
I popped over the road to grab Shaun, and here’s what I got straight after developing during the wash…

It was looking way more on point than the previous 23 sheets I had burnt through and I was now feeling confident in what I could produce using the current set up.
Below is an iPhone shot after it had dried for a short while, following that, another iPhone shot that has been edited in Lightroom. I’m super stoked with the results and a very small amount of tweaking in LR does make a lot of difference, although that’s not really the point.
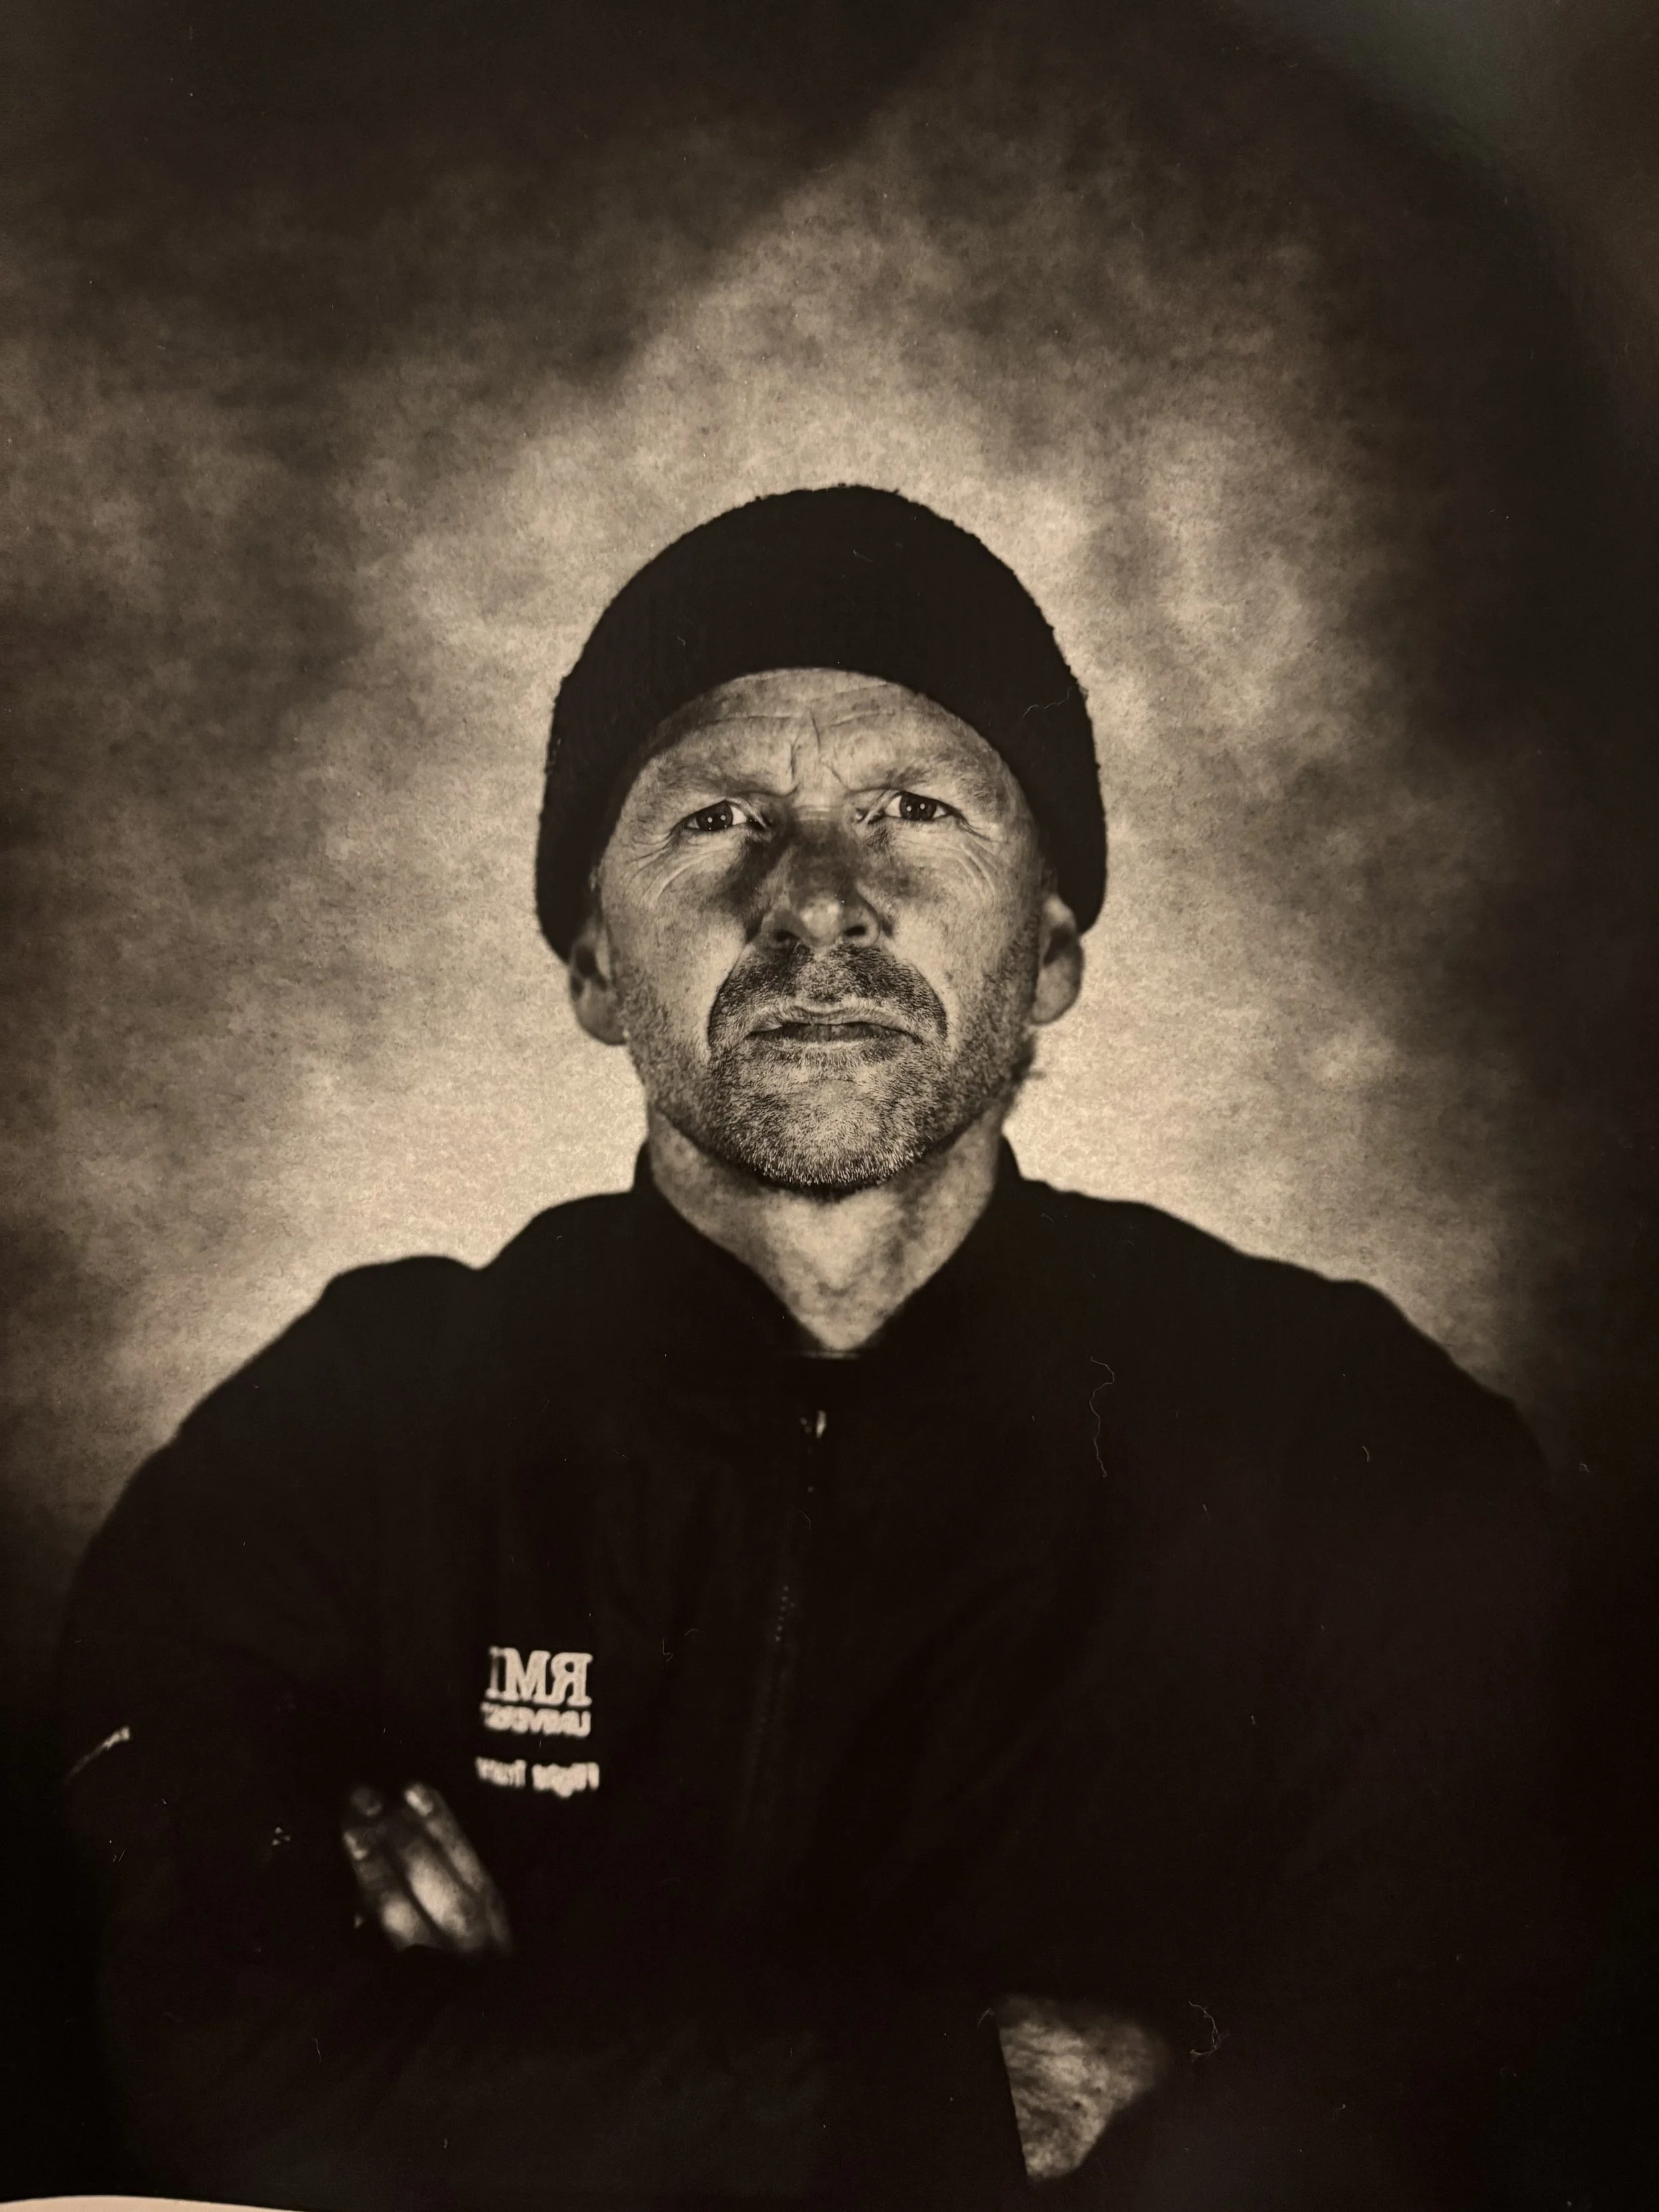

I’m now onto my last shot and kept everything the same, when I took the above photo’s over the road to show Shaun, I managed to find someone else that was willing to sit for the last shot, it turned out just as good!


I’m super happy with how the last 2 shots turned out and I’m excited to get my hands on another 25 sheets, I’ll be putting the order in soon.
Next time, I’ll be setting up in one area, and shooting most of the sheets so that I can really play around to get the best results, first though, I need to build a darkroom box so I can develop on site.
July 2025
Things are getting good and I’m really happy with the results I’m starting to get.
This is Jahman, he’s a legend.


Why did I buy the Fuji XPro3 in 2023?
You can probably tell that most of my photography has been landscapes, although I’ve dabbled in other genres here and there, I’ve always wanted a camera that I can just walk around with and take photo’s of things I find interesting or aesthetically pleasing. Shooting primarily landscapes means my kit is pretty extensive and, grabbing just the camera wasn’t really an option due to a number of factors, which I won’t go into right now, let’s stick to the topic!
I’ve always loved the look of film when I’m scrolling through Instagram, those pastel colour pallets of cool classic cars or sunlit houses always got me double tapping. Check out Willem Verbeeck @willemverb on Instagram and you will know what I mean.
I bought a Mamiya RB67 which I still use and love to try this out myself, I always seem to have a creative itch that needs scratching. It’s just becoming to costly and film prices are set to rise again early 2024!
That leads me onto to the Fuji XPro3. TIK TOK made me buy it, kinda.

The Fuji XPro3 is a mirrorless camera with a 26MP APS-C-Trans CMOS sensor, a hybrid viewfinder and an LCD screen which is only viewable when flipped down. When It’s closed, there’s a small display on the back of the camera that shows the current film simulation your using, a lot like back in the day when you would tear off what film stock and speed you were using and place into that little slide on the back of the film door.

The camera body is weather-sealed and has a titanium top and bottom plate, you can buy them in regular or a DuraTech finish like the one in this post which is scratch resistant.
Have a google if you want more info on the specs or jump on YouTube and binge watch every video made on it just like I did.
It’s suited for street enthusiasts or for someone looking for something a bit different, both are reasons for why I purchased it, for more than it was worth in 2019 when it was released!
Here’s some photo’s I’ve taken with it so far, testing out some film simulation profiles and different subjects. It’s a camera I’m really enjoying using and will for a long to come I’m sure.


Digital Is NOT doing it for me anymore!
As the title says, digital is just not doing it for me anymore, and hasn’t been for quite some time, at least the last year but probably longer!
It might have something to do with just working so much that I needed to rest on my days off, I just didn’t have the motivation to get up and out with the camera.
I love the process of scouting for a good location, setting up, taking the shot, the excitement of wanting to get home and spend some time on Lightroom to get to the finished product, it is still exciting to me, but, there was something missing (no it wasn’t that I needed to print and frame the photo) to which I have no idea what it was! I lost my mojo!
Youtube was giving me a temporary fix, watching the likes of Thomas Heaton doing what he does. Whilst browsing I noticed a huge resurgence in film, 35mm, medium format and large format. It peaked my interest and I began binge watching Willem Verbeck, Ben Horne, Matt Day and Grainy Days amongst others.
It fascinated me, the process was a lot more involving, slower and hands on than digital was and I think that’s what was missing! Although these guys were developing there own film, I liked the feel and look of what film was producing and decided to give it go, even if I did need to send it off before I got to see the results.
I won’t lie, I have shot medium format film before on a Hasselbald 500c which I purchased long before the new hype was in play, and compared to todays prices, I got it really cheap! O how I wished I kept it now! I sold It before I left to travel Australia and brought a drone with the money. The drone now sits in the cupboard and hasn’t been used for a very long time! If you have a keen eye for film you will see which photos in my gallery are taken on the Hassey.
So… I had a shop around and settled on an RB67 kit (which I had owned before and never used) that I found on Facebook Market place.

It’s an absolute monster and I love the getting out and about with it. I shoot pretty much anything on it but I’m learning that light is everything, the photos look flat without it! So I’ll be heading out when the sun is low from now on.
If you want to see what I have done so far then checkout my instagram on the link below. There really not that good but I’m happy enough to have even got some good exposures.
I got my mojo back, but….. I’ve now found large format! See my next blog post if your interested :)
#VanLife

I’m going to break down #VanLife and give you some tips / advice along the way. These are from personal experiences while traveling Australia for 2 years.
Buying your van.
Shopping for our van was hard. We arrived in Australia, looking for a job and a van at the same time so we had a budget that we wanted to stick to. We jumped online and began the hunt for our tiny home on wheels. There’s lots, and most were slightly out of our price range. We were looking for something that had a different arrangement in the back than the norm, this seemed to make them more expensive. Eventually we saw a van online that wasn’t to far away and decided to check it out straight away as other viewings had been booked! It was within price and seemed to be mechanically sound! We brought it!
TIP: Before you buy the van take it for an independent inspection, it costs a small amount of money but worth it in the long run. You will get a full breakdown of the work that needs to be done to make it ready for your travels. Make sure you take it for a good test drive, get the engine up to running temperature and check it’s not overheating.
Preparing.
Once we got the van home it was time to make it ours, it needed to be gutted out and cleaned, one of the windows had it’s own eco system going on! We took everything that wasn’t bolted down, out and cleaned it from top to bottom. This included repainting the wheels black and getting rid of the rust on things like the bull bars and also painting them black. It made it look so much nicer! We then decided to take the van to a carpenter to have some units ripped out the back and replaced. We wanted the configuration to suit our needs better. It was inexpensive in terms of the value it added to our travels.
We then took a trip to K Mart and kitted it out with everything we needed. Cutlery, bedding, camping chairs and table, outside floor mats, fairy lights, we got the lot, way more than we actually needed but hey ho!
TIPS: Treat your van as a van and not a house, we brought far to many things that we didn’t use. Sit down and make a list of what you know you will need. If there’s 2 of you travelling then you don’t need more than 2 knives etc etc. Get some wet wipes, they wash your face and can clean your plates ;) Keep it organised, it keeps a small space from feeling smaller.
On The Road.
The journey began, we got a job over in WA, we were currently in Geelong near Melbourne. That meant we had 2099miles or 3378km to cover. Adding to that we had to drive across the Nullabor, we hadn’t even slept in the van yet! Adding to that, we had 7 days to do it! Fingers were crossed that the van was a good buy and it would make it! We had it serviced and went for it. All was good and she ran like a dream. We done it 5 days. The days consisted of driving mostly, parking up, eating and then snuggling in to watch a movie before bed.
TIP: Make sure you have enough fuel, if a sign says “NO FUEL FOR 750KM” then it means exactly what it says! Get some jerry cans, we brought 2 20L cans to take on the road with us, we did use them but not that often. Take regular breaks if your on a long drive like this one!
Living Small!
Living in a such a small space can be hard, especially if you add another person to the mix. Me and Claire were quite literally side by side for VERY long periods of time. We actually found it pretty easy to be honest. When your days are filled with awesome things to do together you both have a lot to talk about. By the time we had got to where we were ending the day, we set up camp, had dinner and a good chat then into bed for a movie.
Tips: You don’t need what you think you need! When we were getting our tiny home on wheels prepared and ready for the road, we bought a ridiculous amount of things that we actually didn’t need, for example. We only needed 2 forks, 2 knives, 2 spoons and something to stir out soup with. We most definitely did not need enough cutlery to deck out a kitchen in a 3 bedroom house!
Keep things organised, put them back where they belong when your done. This will keep the other half happy, trust me!
Have a routine for setting up camp, we both had things we done on our own and jobs we done together. Setting up camp was quick and we never forgot to do anything, like tie the awning down when it was windy.
Buy what you eat, it’s easy to go overboard and end up with surplus food that ends up in the bin. Plan out your food for the week and don’t buy again what you threw out before!
Make sure you both have have your own space. Even in such a small place it’s important.
How I shot "Falling Stars"
When I upload a photo like the one below the main question I often get is “How did you do that” and the comment I get most is “You must have a really expensive camera”
The question, I’m happy to answer but the comment, is the most frustrating and I know i’m not the only photographer that hears this!
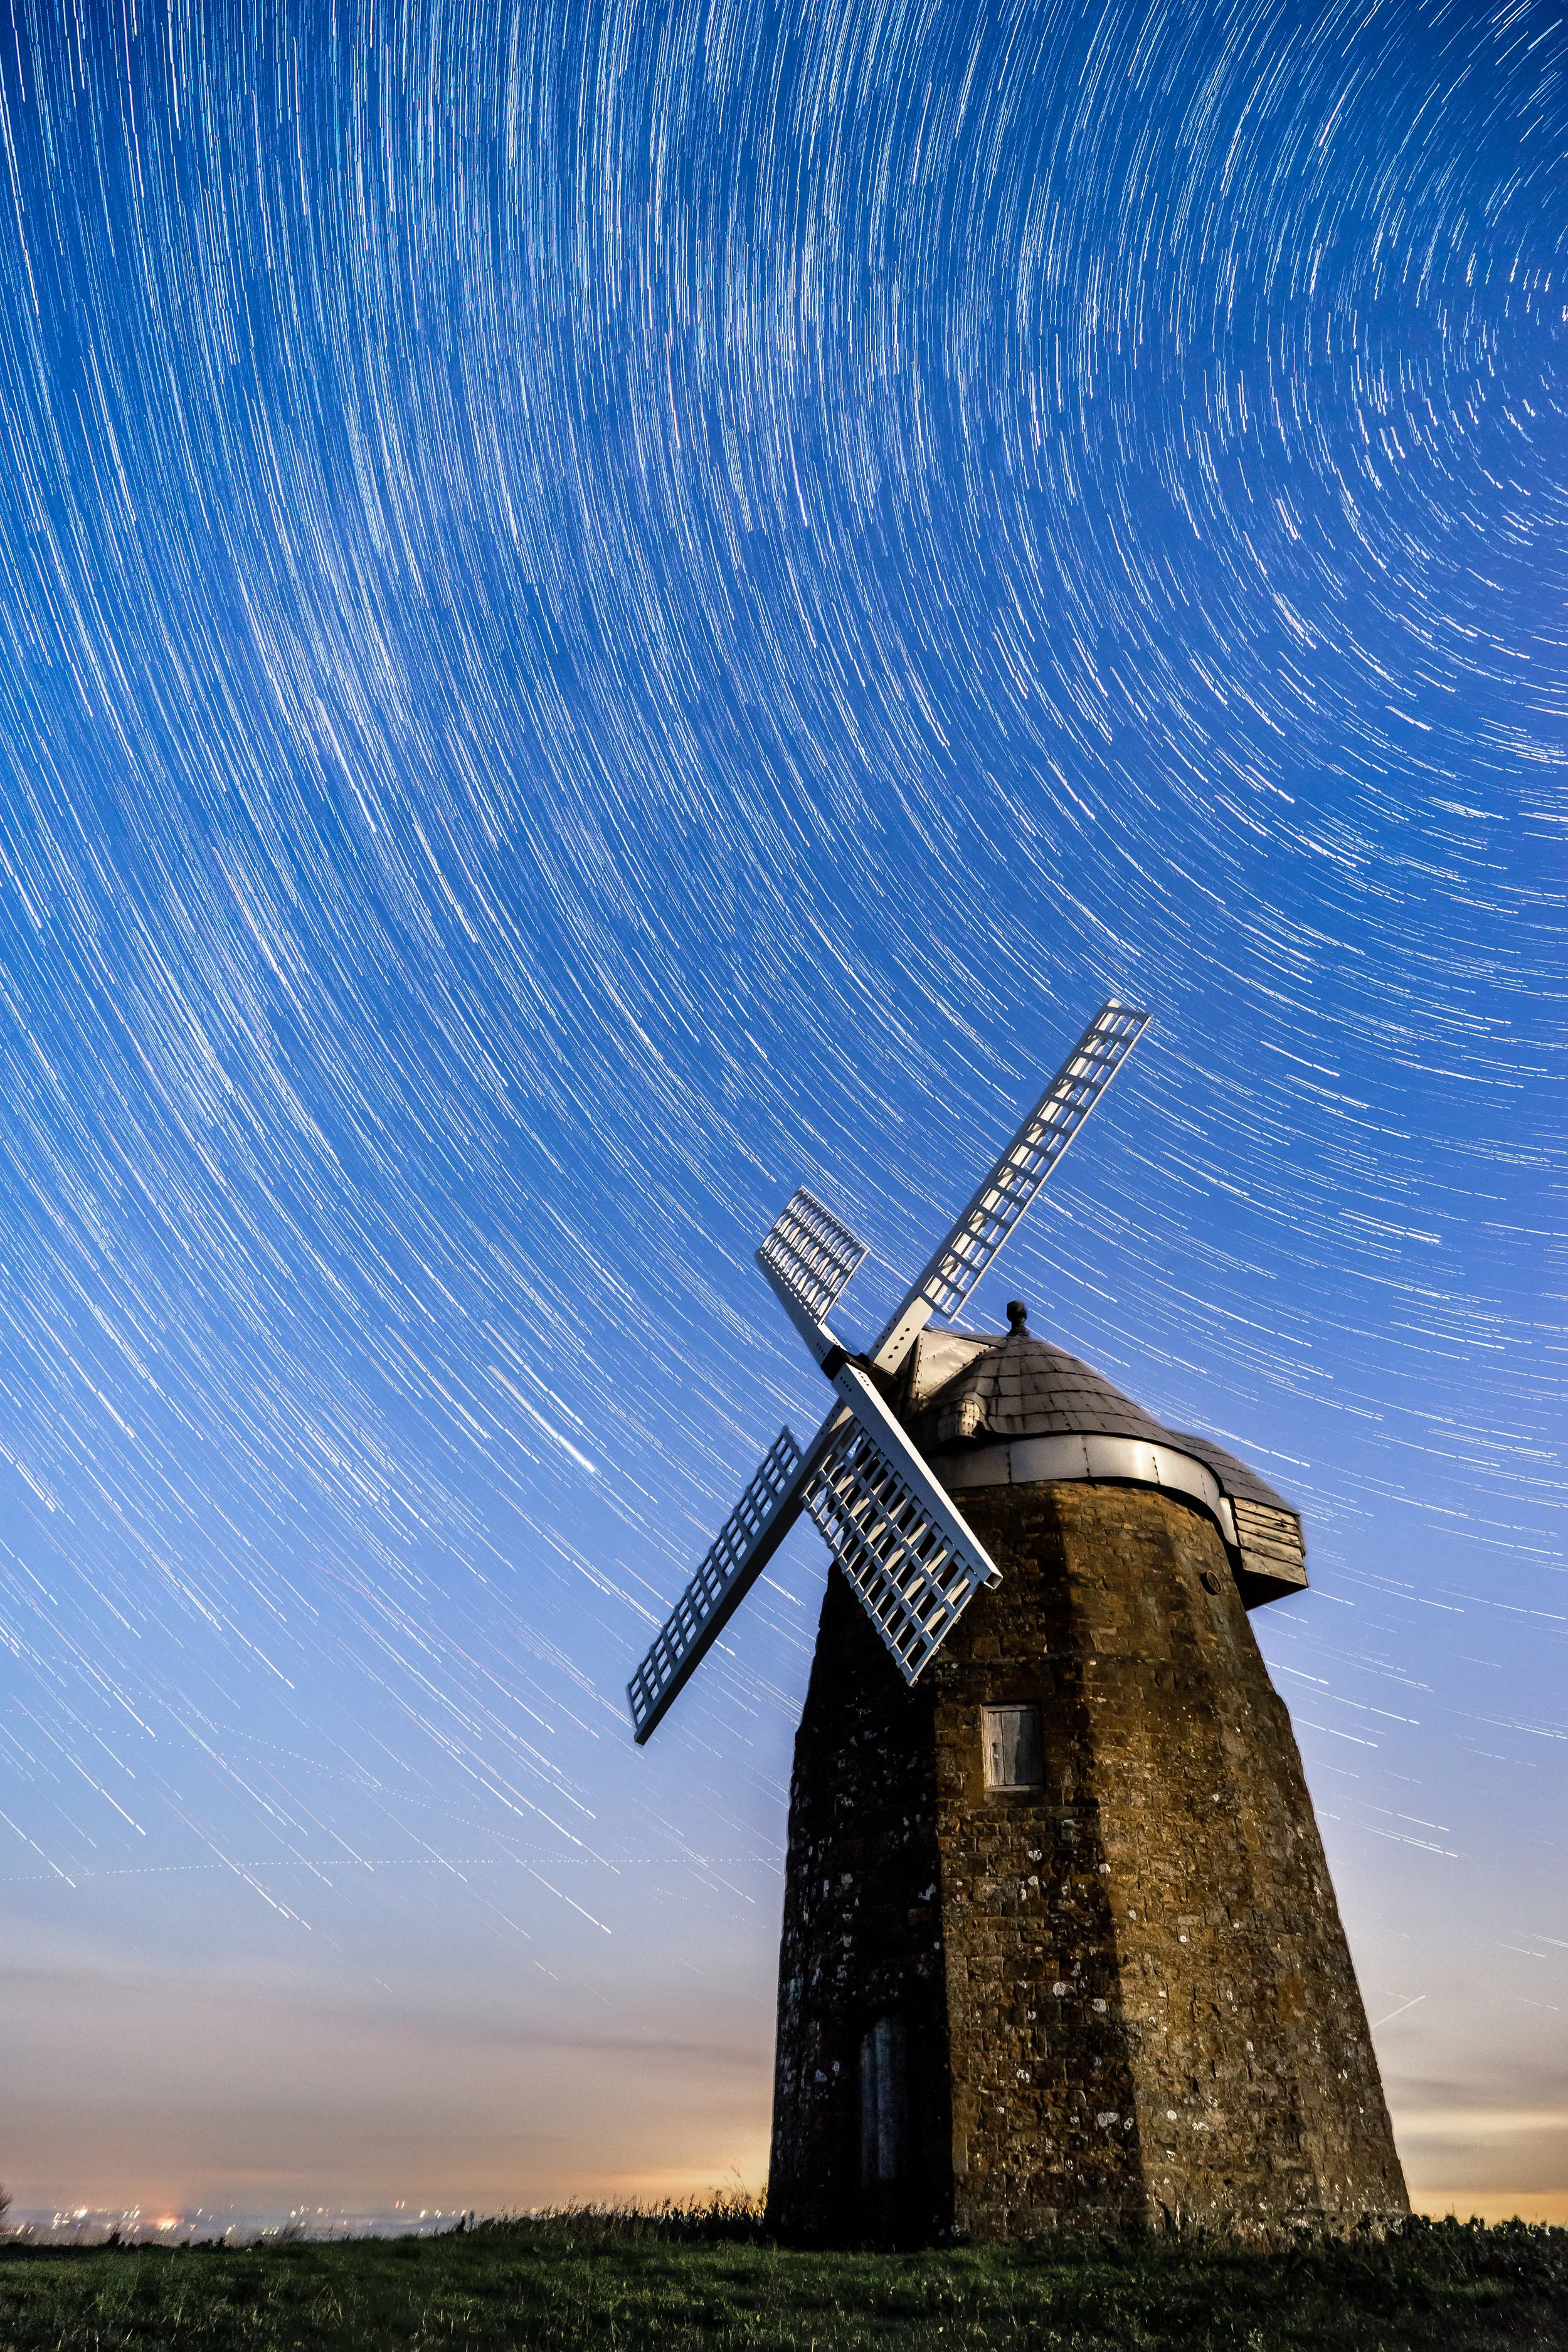
I’ll do my best to explain how I went about capturing the image and whats needed.
What’s needed:
A camera. Any camera that will allow you to shoot in RAW and have manual control over it’s settings such as Shutter Speed, Aperture and ISO. Not essential but good, would be a camera that excels in low light which will help reduce noise in the final image.
Fully charged batteries. Depending on the length of star trails you would like this could take anywhere from 30mins to a few hours.
A Tripod. Your camera will be in the same spot for at least an hour taking a number of exposures so it needs to be sturdy to minimise any kind of camera shake. This will ensure the final image is in focus.
A remote cable release. This will allow you start and stop the exposures without touching the camera. It will also allow you to lock the shutter button down, this means you can leave the camera to do it’s thing for the duration.
Warm clothing. Depending on where you are it can get pretty cold when your stood around outside in the middle of the night.
Location.
So to start off your going to want to find a location with some good foreground interest, in this case I found a lovely looking windmill that is accessible by foot. Ideal conditions would be clear sky, bright stars, no moon and away from any light pollution, this can’t always be the case. On this particular night the the moon was at 85% and the location is about 6 miles away from a very large town, it’ s almost a city I would say!
Composition.
When you arrive at the location it’s time to compose the image. I dial in a really high ISO and low aperture and about a 5 second exposure which means I can take photos quickly to see what composition works best. The photos will look terrible but there not needed anyway. I chose a composition where I could place the very large town behind me and where the moon would leak a little bit of light onto the foreground of my image.
Focusing.
Now it’s time to get focus. To do this you will want to be in manual focus mode, magnify your screen as much as you can on a visible star in the sky. This star, if out of focus should look like a big blurry white blob! all you need to do is keep turning that focus ring on your lens, until the star becomes a sharp white dot. Once focus is obtained then leave it as is.
Exposure Settings.
You can just use trial error to fond out what’s working best. My settings for this photo where:
Shutter Speed: 20 seconds
Aperture: F4
ISO: 1000
These settings gave me just enough light on the foreground for me to pull some detail out and also meant I didn't have to much light pollution, although I did end up with some on the horizon line. Remember, a high ISO will give you a lot of noise in the image, in this instance I would not have gone any higher. A longer shutter speed would also be ok if I wanted to reduce the ISO as I didn’t need sharp stars for star trails. My aperture of F4 allowed for the windmill to be in focus as well as the stars.
Start Shooting.
I set my camera to continuous shooting mode and locked it down. This means the camera will continue to take 20 second exposures for as long as the button is locked in place.
In the meantime.
I like to look up at the stars. Once your eyes have adjusted it’s amazing what you can see when you spend some time actually looking. I’ll sometimes take a hot flask with me for a hot chocolate, I’m probably the only man in the UK that does not drink Tea or Coffee! Snacks is always good. Other than that I’m normally shining my torch in any direction that I hear a rustle!
Post Processing.
There’s lots of ways to post process an image but here’s what I do for Star Trails.
I upload all my images into light room.
I edit one photograph to my desired look.
Check all the other images for any planes or undesired objects that might ruin the shot.
I then sync these settings across all the other photos.
They are then exported as jpegs.
Once exported I use some software that is free to download called StarStax
From there you basically drag and drop the images into the programme, select your desired settings and let it do it’s thing.
Once the image is done I’ll take it back into Lightroom for some very minor adjustments and that’s it. The image above is what I’m left with!
I hope you have found this useful, remember, this is how I do it, it can be done other ways, there’s lots of resources online to check out. If you have questions then just drop me a message and I’ll do my best to help you out.
Happy shooting!
Carl.
Being made a Brand Ambassador!
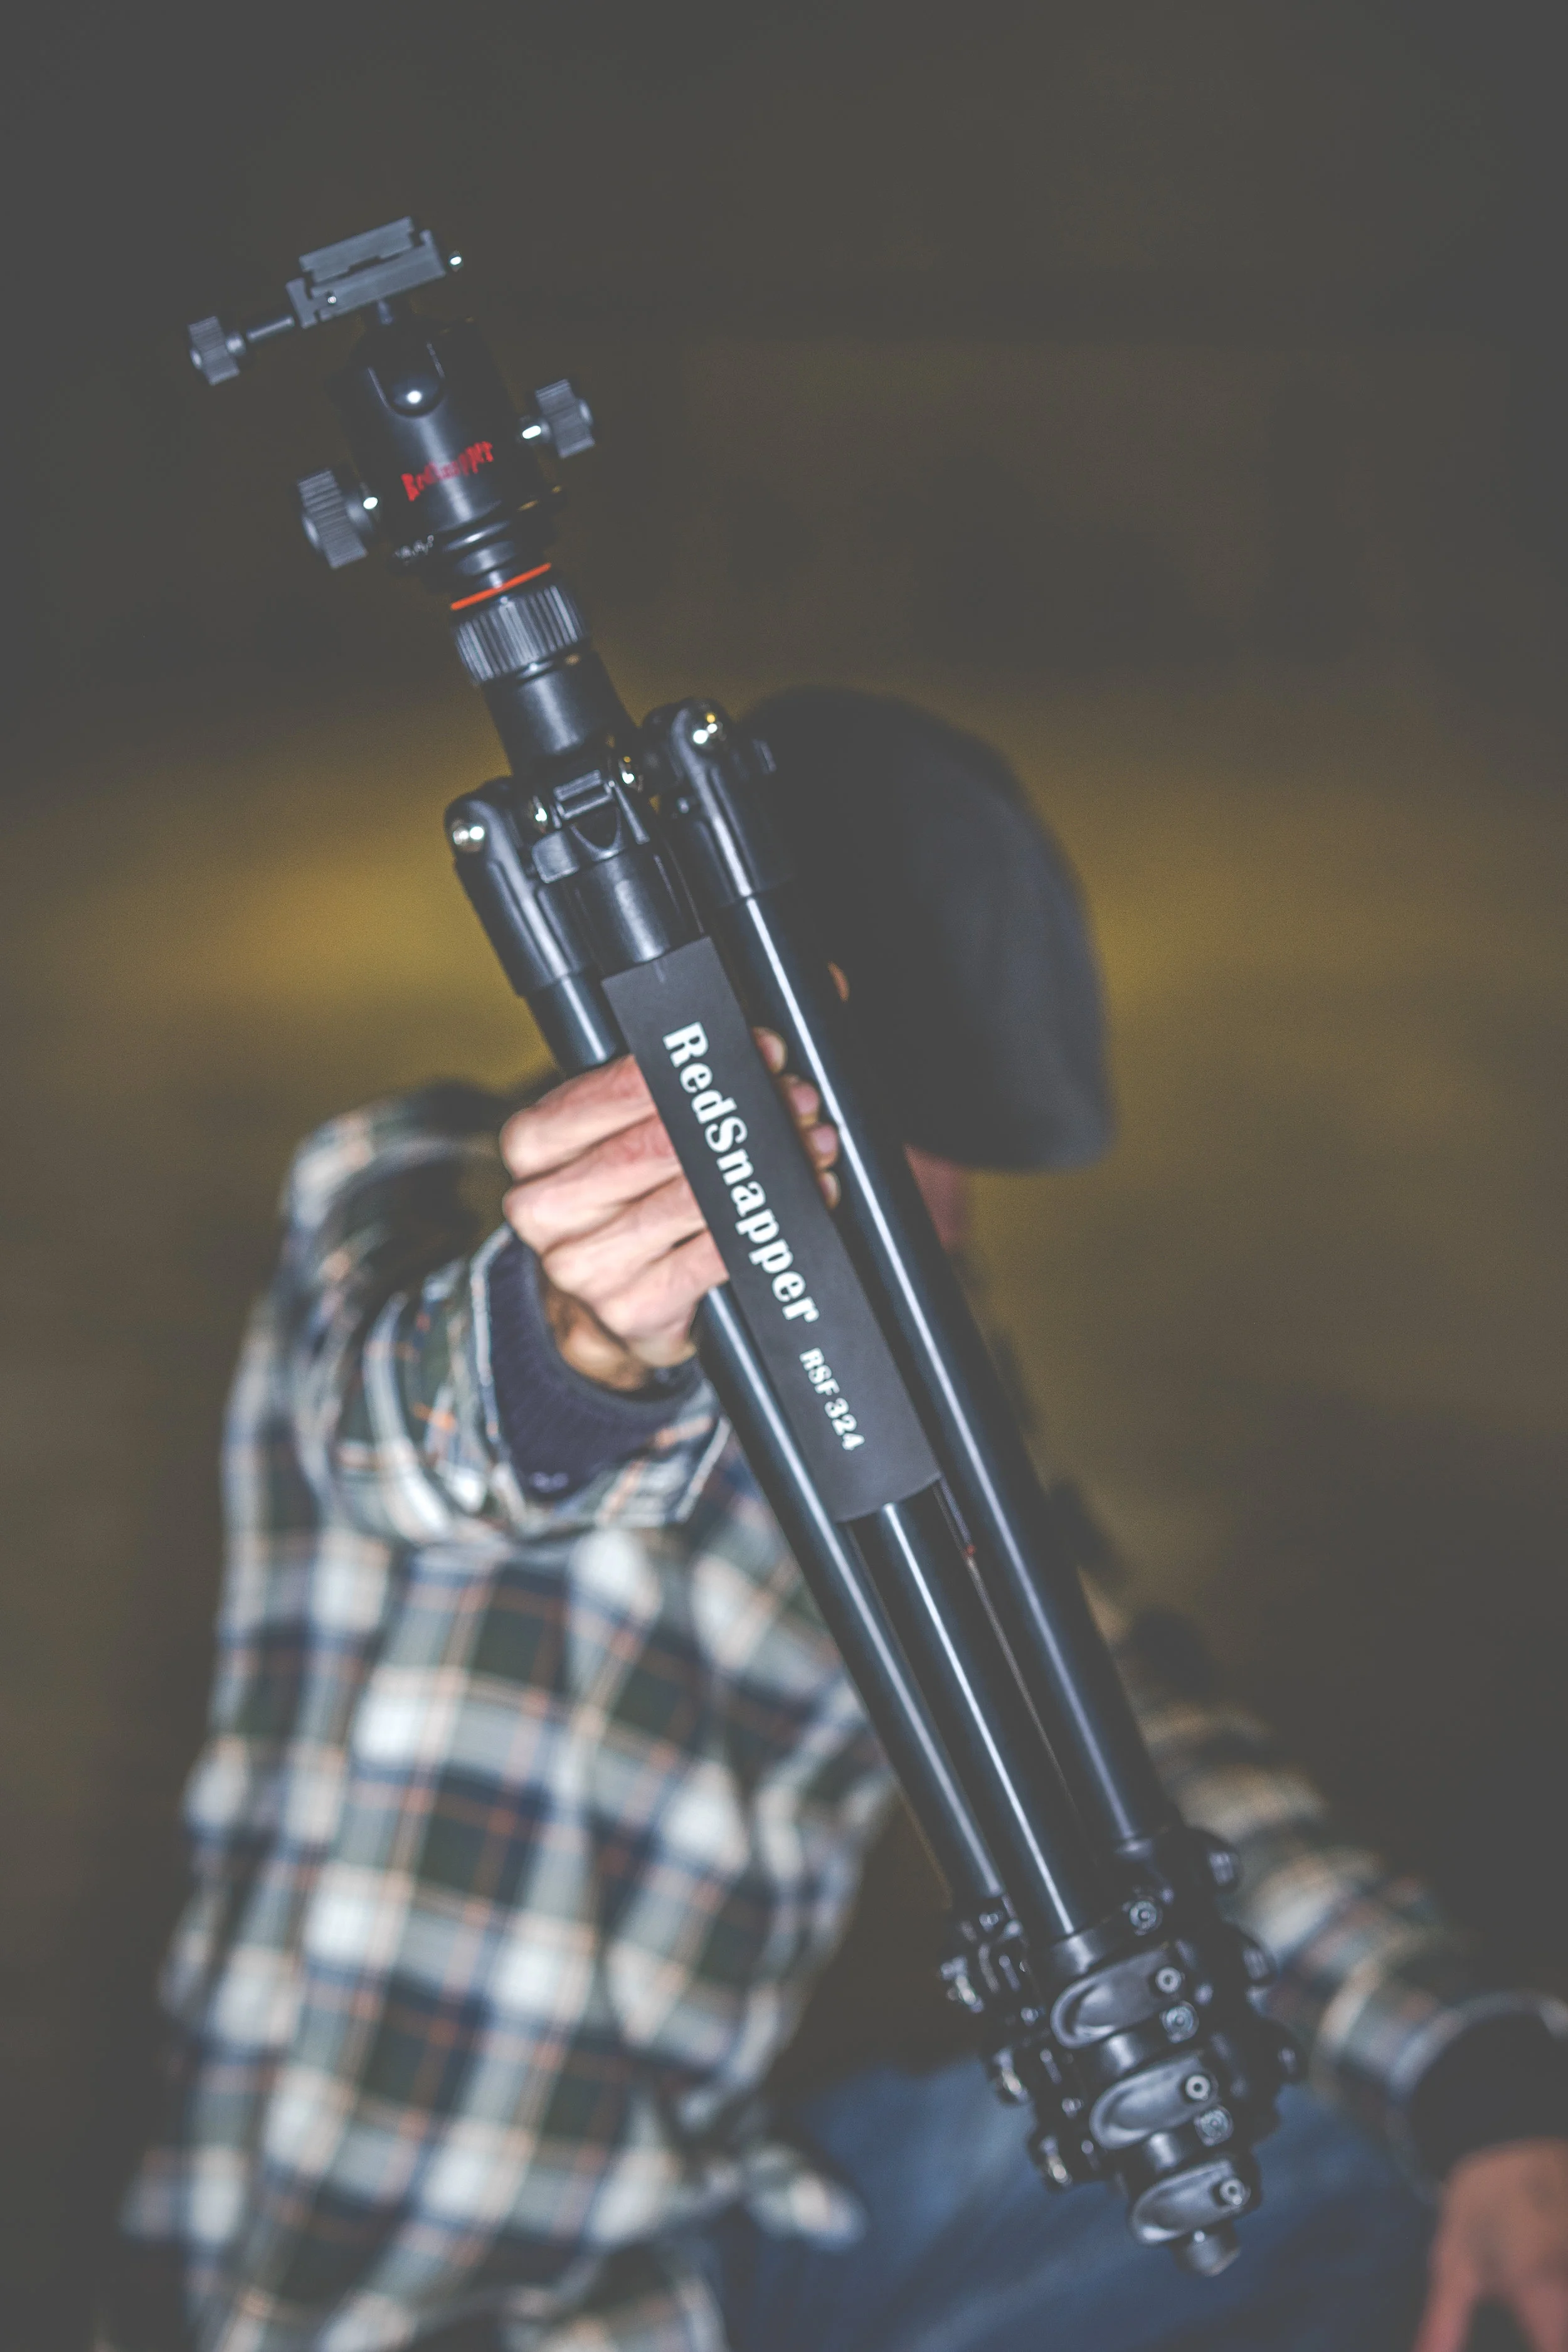
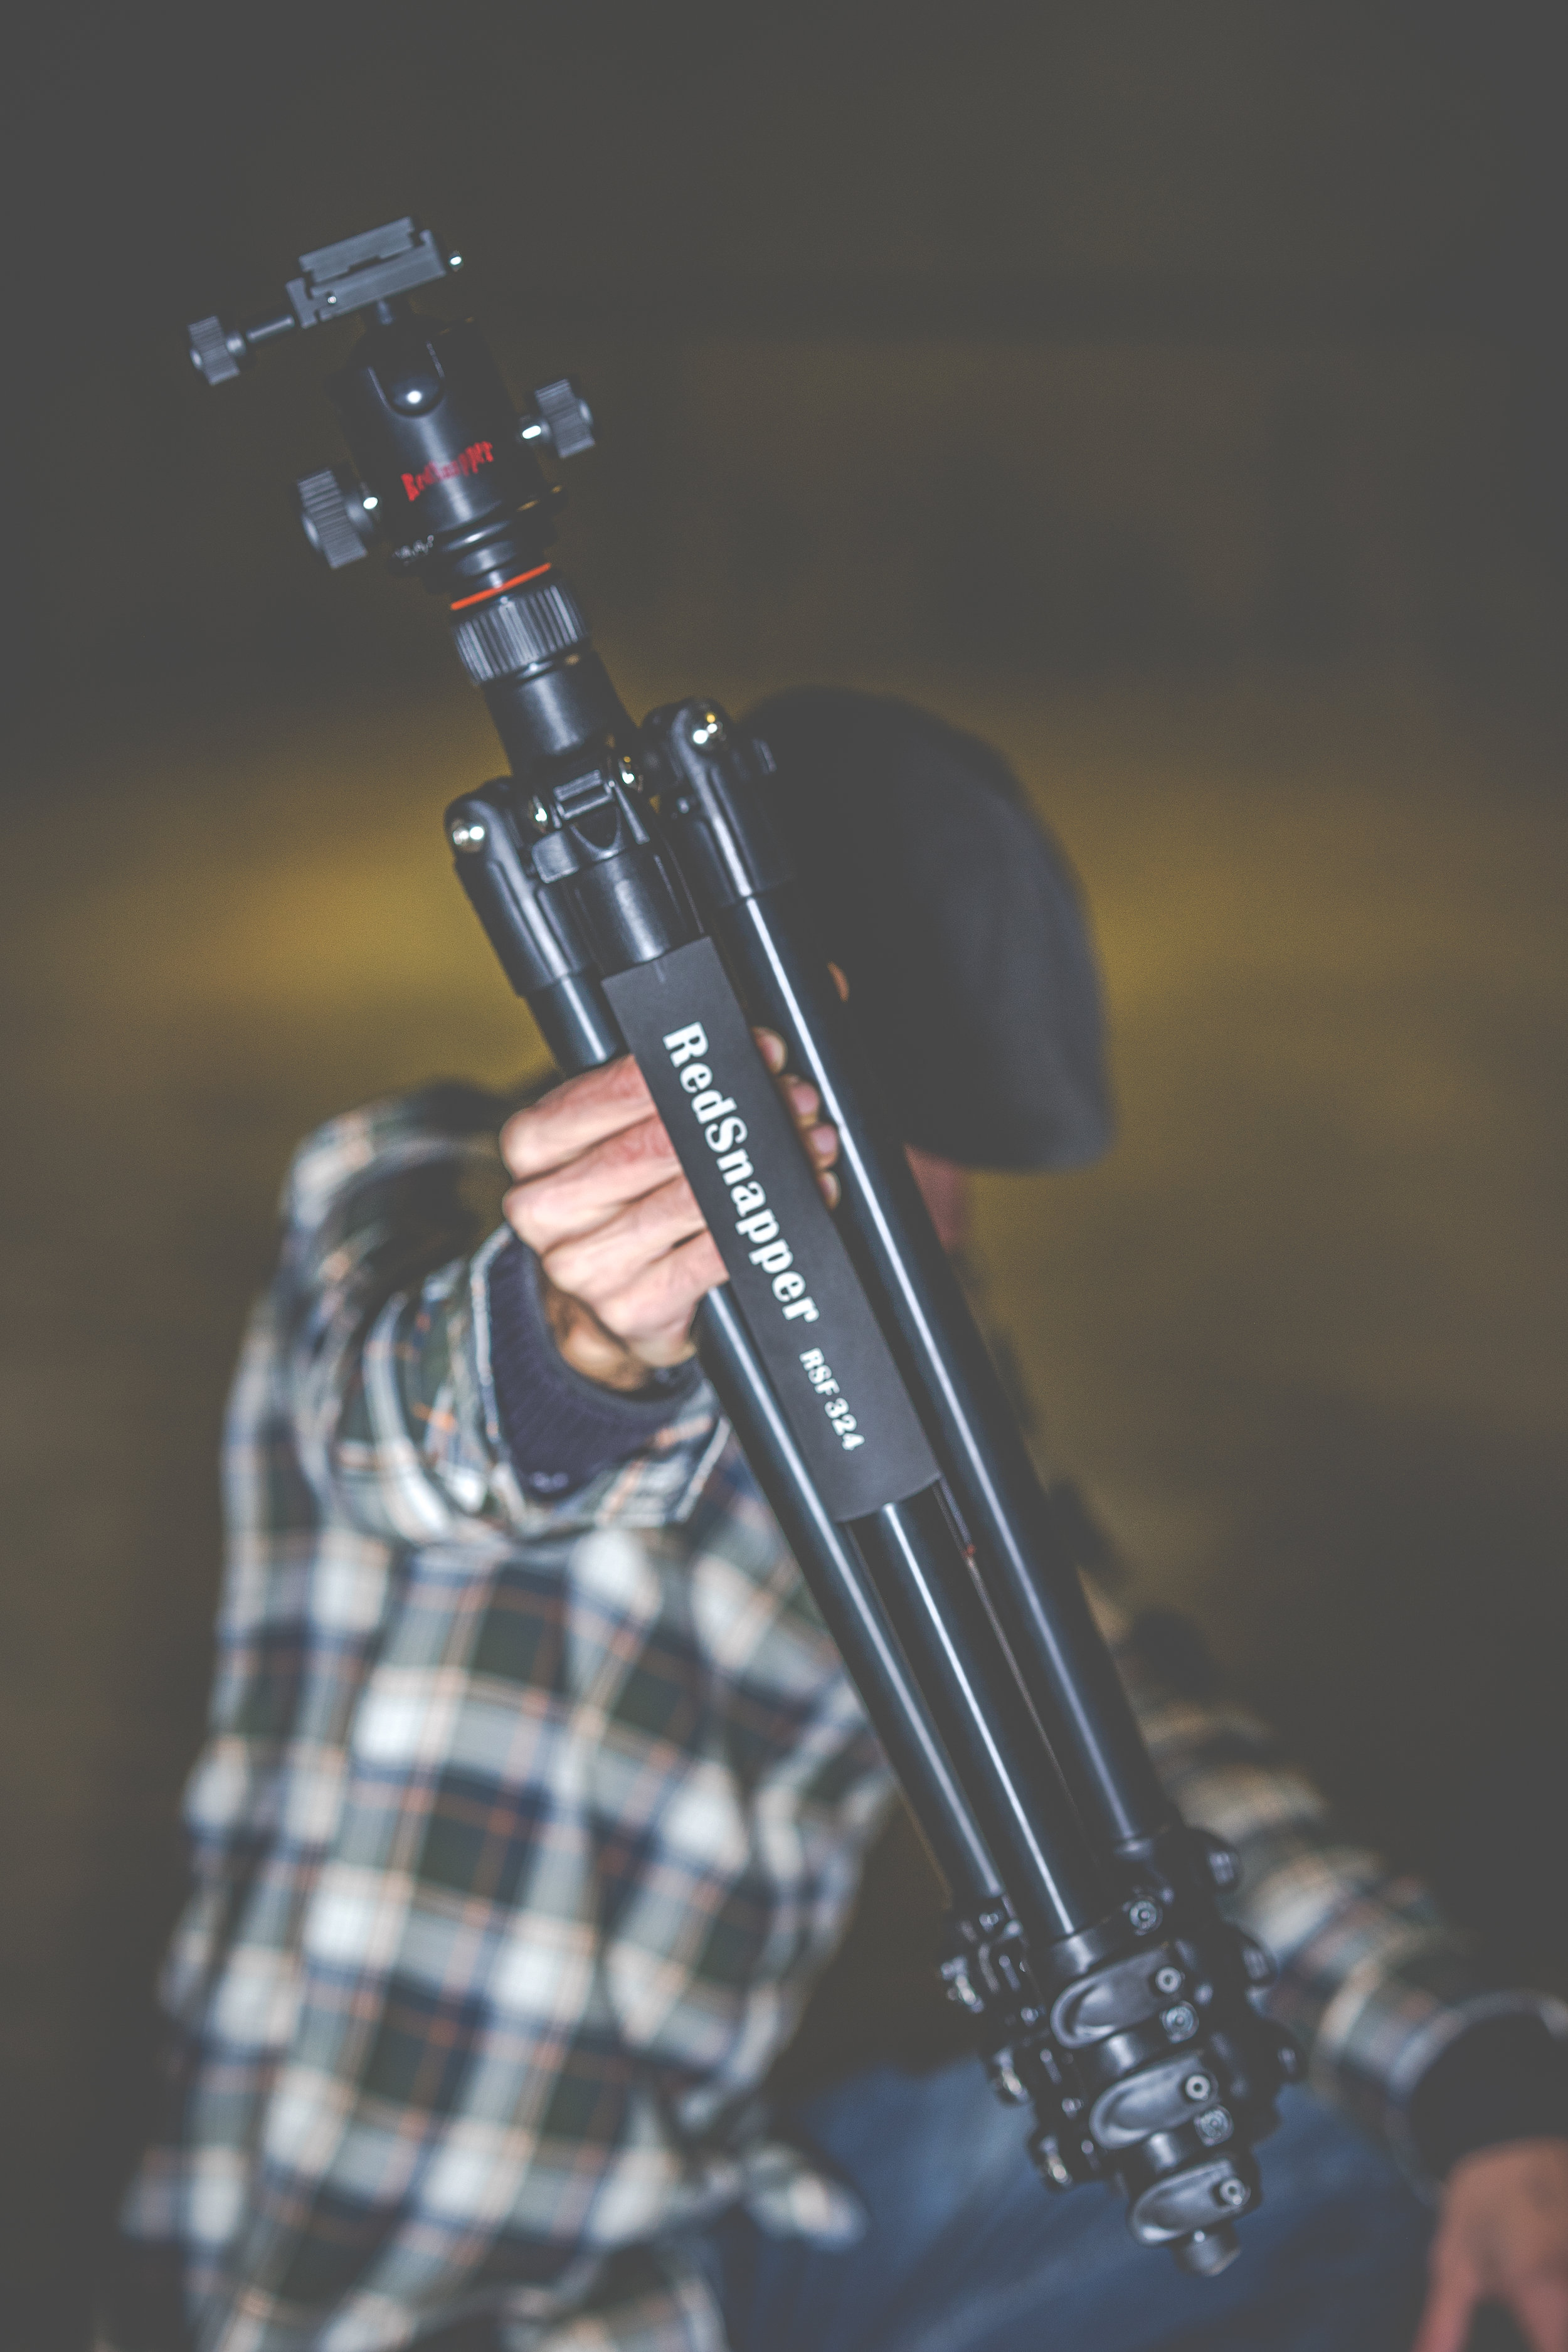
I Love Red Snapper! Iv’e been using an older model than the one pictured for the last 6 years, I didn’t have a great deal of money to spend as I was really just starting out in photography, a friend of mine recommended them as they were built well for a good price and local. He Wasn’t wrong! For a little over £100 at the time I couldn’t believe it, It felt heavy/sturdy, which I like, and as I’m tall I like a tripod that can extend to 6ft without the centre pole being extended and the whole thing blowing in the wind.
It served me well for a very long period of time while travelling, it went through so much that I’m surprised it’s not in the bin!
On my return back to the UK a clip had snapped on one of the legs, not a problem, I called in to see Joe of Red Snapper and he replaced the clip for me for free, this was 6 years after I purchased it! While there we got to talking about the product, I explained that I couldn’t believe how well built the tripod felt and how it had performed for the price!
Long story made shorter, I was made a Brand Ambassador and supplied with the RSF - 324 Tripod with the RSH - 12 ball head. This Tripod and head deal comes in at £159.95. I can honestly say it’s worth it! You can check out all the specs here.
Being an Ambassador for a brand I use, recommend to people, has great products, great customer service and are local is perfect, it makes complete sense!
If your interested in purchasing any products from them, be sure to use the CODE: CEP10 at checkout and you will get 10% off all Red Snapper branded products.
Cheers,
Carl.